 Last updated: April 21, 2026
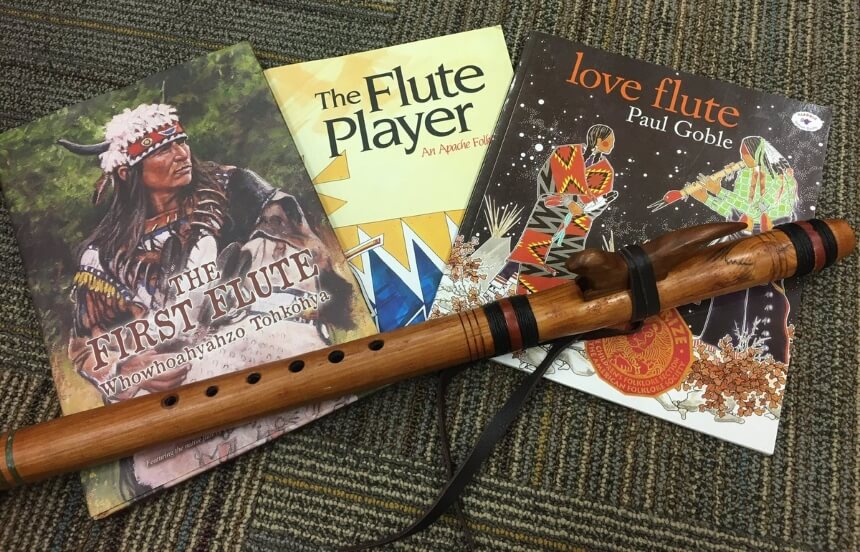
The Native American Flute, also commonly referred to as the love flute or the courting flute, is a musical instrument that has been part of the American culture and the world at large. It is fun to play, and making it is even more rewarding. It is one of the easiest woodwind instruments to build. Plus, you don’t need so much to make the instrument. You only need some woodworking skills and a few required tools.
You will know you have mastered how to make a Native American Flute when you make one with solid durability, and aesthetic appeal, and exceptional sound. It is the tools you choose to use that will mainly determine the type of Flute you make. You can use the basic tools that don’t require much input in terms of space and electricity, or you could use the advanced tools that will sure require you to plug in something.
Legend has it that flutes can be made with just a pocket knife and a few sticks. Presently, there are multiple ways of making a Native American Flute. You can use the traditional methods that only involve the use of simple tools, or you could use the modern methods that will involve sophisticated tools like specialty knives and carving gouges.
Here is some detailed information for a hobbyist or small flute maker who wants to know how to make a Native American flute out of bamboo Trusted Source Bamboo - Wikipedia Bamboos are a diverse group of evergreen perennial flowering plants in the subfamily Bambusoideae of the grass family Poaceae. The origin of the word “bamboo” is uncertain, but it probably comes from the Dutch or Portuguese language, which originally borrowed it from Malay or Kannada. en.wikipedia.org or Sumac Trusted Source Sumac - Wikipedia Sumac, also spelled sumach, is any of about 35 species of flowering plants in the genus Rhus and related genera in the cashew family (Anacardiaceae). Sumacs grow in subtropical and temperate regions throughout the world, including East Asia, Africa, and North America. en.wikipedia.org .
 Tools are the top determinants of how strong your Flute will be. There are two main categories of tools used to make Native American Flutes: the basic and the advanced tools. If you are looking to make a flute for your own use or as a gift, then you only need the basic tools.
Here is a list of all you will need to make a solid flute that looks nice and plays well, like the famous walnut Native American Flute by Spirit Flutes. The Flute is popular because it has a high-quality, beautiful tone, and it is highly sensitive and responsive.
Workbench – This is the most basic thing you need. It doesn’t have to be a professional bench. It only needs to be strong enough to withstand the rough process of flute making. You can use a regular wooden deck or any old wooden bench in your home. Also, it doesn’t need to be so big if you are making simple flutes.
Knives – A knife will undoubtedly be useful as it can cut things. It can cut the wood, nest, block, or around the mouthpiece. Using a regular knife is a lot of work and needs excellent skills. Therefore, you need specialty knives like craft knives, popularly used by crafters and modelers.
It would be better if you got an all-around set of craft knives like the FANTASTICAR Craft Knife set. The multipurpose set includes 29 pieces of durable, easy-to-use blades that you can use for various tasks.
Besides the craft knife set, you need a robust pocket knife. It is thin yet strong enough to split wood without breaking pieces away from it like a hatchet would.
Handsaw – You are likely to use lumber or branches to make your Flute. You will need a handsaw to cut either the lumber or branches to the required length. There are many handsaws out there, but a basic wood saw will do for your basic Native American Flute. For added convenience, you can use a power saw.
Chisels – These are a must-have if you are making your Flute from any type of wood. You will use them to carve the inside of the wood as well as create the nest area. You can opt for a router if you have the budget, but a chisel is the perfect low-tech tool for carving the insides of wood.
You will need a round chisel to carve the inner chambers of the wood you are using, straight chisels to cut and make the sound mechanism as well as level the nest area, and a semi-round chisel to clean the inner chambers. You can choose to buy each of these tools separately or get a convenient and laudable chisel set like the REXBETI 10pc Premium Wood Chisel Set. The set features 6 wood chisels, a sharpening stone, heat-treated blades, and 2 carpenter pencils.
Polishing sandpaper and diamond files – Your Flute’s tube needs a clean and smooth finish for a nice touch and excellent sound quality. You will need a few sheets of sanding paper with coarse and fine grits to sand the interior and exterior of your Flute’s tube. You also need diamond files Trusted Source File (tool) - Wikipedia A file is a tool used to remove fine amounts of material from a workpiece. It is common in woodworking, metalworking, and other similar trade and hobby tasks. en.wikipedia.org to shape and finish the nest area of your Flute.
A burning tool – To make the finger holes and bring your notes to a good tune, you will need a burning tool. When plugged in, a burning tool will heat up and easily burn through the wood. To make your work easier, you can use a power drill to make finger holes then use a burning tool to expand them.
Drill and drill bits – A drill will come in handy when you need to make some holes. A hand power drill would suffice. Also, you only need the standard drill bits. Get them in different sizes for drilling the mouthpiece and the finger holes.
Woodworking glue – This is a must-have as the wood bits must be glued together. Be sure to go for water-resistant glue that wouldn’t be affected when the Flute comes into contact with moisture or water.
Woodworking clamps – Once you have glued pieces of wood together, you will need clamps to hold them together so that the glue can work well. If you can’t get wood clams, you can use rubber bands though their hold wouldn’t be as strong as that of the clamps.
 After gathering all the necessary tools, you can follow these steps to make a Native American Flute.
Step 1 – Select the wood that appeals to you aesthetically and character-wise. It can be foreign or domestic. Ensure the wood is dry, then cut out a solid 2″ by 2″ block and about 20″ by 25″ length.
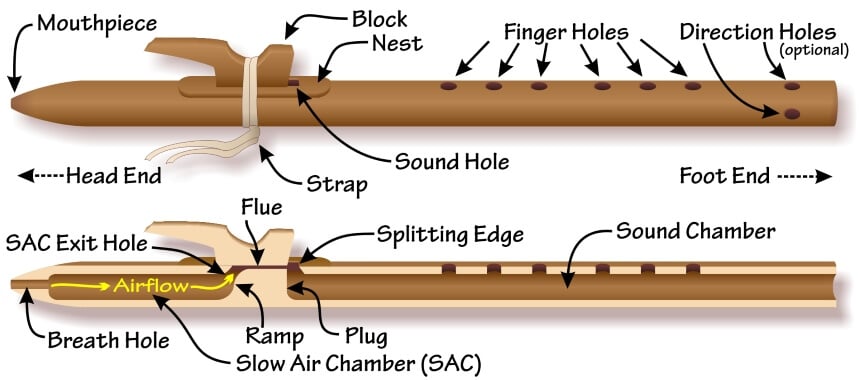
Step 2 – Use an appropriately sized gun drill bit to bore a hole that becomes the sound chamber where the finger holes are placed. On the opposite end, bore another hole that becomes the breath hole and “slow-air channel.’ Ensure there is a lug or inner wall of wood between the sound chamber and slow-air channel.
Step 3 – Place the block of wood you have hollowed out on a workbench or lathe and sculpt it to the shape of a flute. Use a sanding paper with coarse grit to sand the wood for a first pass.
Step 4 – Use a milling machine to precision carve the Flute’s nest. You will know you’ve hacked it when the block looks like a bird sitting on eggs.
Step 5 – Next, still within the nest, carve and file the slow-air-chamber-exit hole and the soundhole. It is through the slow-air channel that air from your lungs, through the Flute’s mouthpiece, passes to rise through the slow-air-chamber-exit hole. The air then enters the Flute and flows across the soundhole.
Step 6 – Voice the Flute by giving it the keynote G before creating finger holes. You will achieve this by adjusting the soundhole and overall length of the Flute gradually. When the keynote is produced successfully, you can locate and burn the finger holes.
Step 7 – Check and tune each hole accurately according to the required notes. Repeat after 24 hours, then sand the inside and outside of the Flute for a smooth finish.
Step 8 – After sanding, soak the Flute in a natural oil finish, then apply finishing coats on it for the desired gloss. Leave it to dry for a few days, then apply a final coating of natural wax. You can then inspect the Flute and verify the tuning, and voila! You have yourself a Native American Flute.
Just like any other instrument, a flute cannot sound right if out of tune. You cannot tune a flute if you don’t understand flute tuning Trusted Source How to Tune a Flute: 10 Steps (with Pictures) - wikiHow Learn to recognize when your flute is out of tune and correct the problem when playing. www.wikihow.com . You must know when it’s flat or sharp and how its size affects its tune.
The first thing you need to do is adjust the headstock assembly of the Flute to the correct position. Next, adjust its headjoint every time you play by raising your pitch or lowering your pitch. If you are playing flat, you will raise your pitch by pushing the headjoint, and if you are playing sharp, you will lower your pitch by pulling out the headjoint.
It is cheaper to buy the best Flute out there, but where is the fun in that? What do you do with the creative spirit in you? Here is what you do; you learn how to make a Native American Flute from scratch with your hands. Once you have gathered all the necessary tools, it isn’t any rocket science. We have provided clear guidelines and hacks that you can follow to make a great sounding basic flute using basic tools.
Anyone interested in learning how to make a Native American Flute from any kind of wood can benefit from the tools and making process guidelines. If you are looking to make your Flute yourself, then the probability that you can play one is pretty high. However, the same can’t be said about tuning the Flute. Most flute players can’t tell when their Flute is out of tune and how to fix it. We have provided a brief but clear guide on how to tune your Flute so that you don’t have to hear from your music instructor again.


This article is so interesting! I never knew that making a Native American Flute could be so simple. I love how it explains the tools and materials needed in a clear way.
I’m really excited to try making my own Native American Flute! The step-by-step process seems easy to follow, especially with the helpful tips and tool recommendations. Can’t wait to hear the beautiful sound it will make!
I’ve always been interested in woodworking and this article has inspired me to give flute making a try. I like that it mentions using basic tools so even beginners like me can try it. It sounds like a fun and rewarding project!