Last updated: June 02, 2026
If you deal with audio and video content creation, you have probably realized just how crucial sound is to your projects. This applies to video creators, musicians, voice actors, podcasters and more. That microphone in your headphones just doesn’t cut it, and thus you need something professional grade. This is where the Blue Yeti from the Blue Microphones Trusted Source Blue Microphones - Wikipedia Blue Microphones (legally Baltic Latvian Universal Electronics, LLC) is an American audio production company owned by Logitech that designs and produces microphones, headphones, recording tools, signal processors, and music accessories for audio professionals, musicians and consumers. en.wikipedia.org company comes in.
Despite being more than a decade since the Blue Yeti microphone was introduced to the market, it is still the go-to option for many. It is also affordably priced in comparison to other professional-grade microphones in the market. That said, it does present a challenge to newbies to set up and use, which is why we are here. With the information below, you’ll learn how to use the Yeti microphone effectively to achieve the best audio results.
Of course, before you can use the mic, you have to set it up in your studio/recording area. Notably, the way you set up the mic could mean the difference between good audio and having to do the recording session a second time. We’ll walk you through how to do it right in the section below so that you can get high definition sound whether you’re recording drums, vocals or other acoustics.
 You have a few choices with regard to the devices that you can connect to. Examples include your computer, an audio recording device, a mic pre-amp, Dslr cameras and more. Again, this is dependent on the type of content creation that you do. If you’re a podcaster, you’ll probably be fine working with your computer. However, if you’re a beginner recording drums, guitars, vocals, and other musical instruments, you’re going to need to augment your setup with extra gadgets.
Let’s start with a basic computer setup. Whether you’re using a Macbook or a Windows PC, the first step is to plug in the USB cable to the mic and the computer. Next, you’ll have to change audio settings on your PC. For Windows devices, you’ll find the settings in the control panel while for Macs they will be under system preferences.
Go to the “recording” or “input” tab depending on your machine and ensure you select the “Yeti Pro Stereo Microphone” option. If you need headphones in your setup, you’ll want to adjust your settings for that as well. In the Mac scroll down to the “output” tab, choose the “Yeti Pro Stereo Microphone.” This should be followed up by adjusting the output volume to 100%. After that, you may need to adjust the volume knob on the mic to where it suits you best.
For Windows, you need to find the “playback” tab if you’re adding headphones to your setup. You’ll again pick the “Yeti Pro Stereo Microphone” option before setting the playback volume at 100%. According to most reviews using the Blue Yeti Nano Premium USB with your Mac or PC is easier since it is a plug and play option compatible with both types of devices.
You’ll use an XLR adapter instead of the USB cable when using a recording device or a mic pre-amp. However, the recorder or pre-amp that you use has to have phantom power; otherwise, it will not work.
Lastly, if you’re wondering how to use Yeti microphone on Canon or Nikon camera, it involves connecting the USB cable to a computer. The USB cable will then act as a source of power. After that, you can link the mic and the camera using the 3.5mm audio jacks and an aux cord.
 Next, you have to select a suitable recording mode. If you’re doing a one-person recording session where you’ll be the only person speaking into the mic you should go with cardioid mode. This will allow the mic to only pick sound from one direction. It should work wonderfully for voiceovers, podcasts, vocals and some instruments, e.g. guitars.
If you’re doing interviews, vocal duets or recording two instruments on opposite sides, the best mode is the Bidirectional option. For capturing wide sound from both sides of the mic, the stereo mode is best. Finally, if you want sound collected equally from all sides of the mic for example when recording drums, you’ll have to select omnidirectional mode. Refer to your manual for the symbols of these modes.
Distance will also affect how your recording sounds. We advise your position the mic about six inches from your mouth. If you’re recording a new guitar, your new drum heads or other instruments, you may need to position the mic further away so the sound can fully develop before the mic picks it up.
The gain and volume settings also need to be just right for you to get the most out of each recording session. Notably, the gain and volume knobs are well-labelled on the mic, and you shouldn’t have any issues finding them.
Also, plug in your headphones. This will allow you to monitor your sound and make sure all levels are correct. Users recommend getting the Blue Yeti X Professional Condenser USB Microphone if you’re using a Mac or PC due to the high-res metering provided on the body of the device that makes adjusting levels a breeze. Lastly, the 3.5mm jack for the headphones on the bottom of the microphone, the same as the USB port.
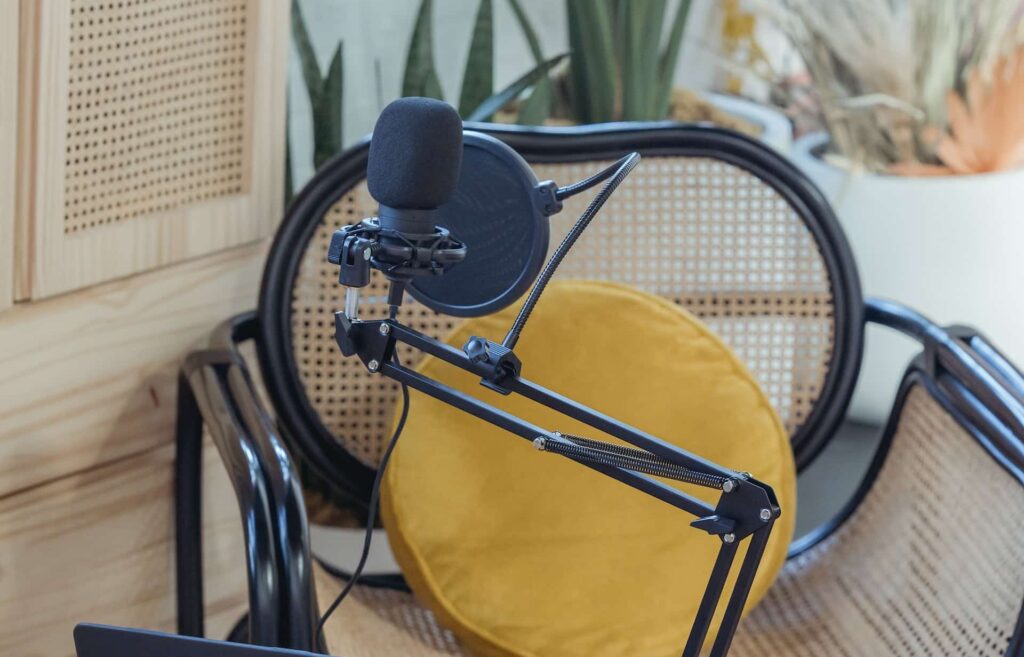
With your basic setup complete you can add a few things here and there to make sure the sound is pristine. One is to talk into the front of the Yeti Mic since it picks up sound from the sides of the mic grill. A few beginners make the mistake of talking into the top of the mic. Also, you might need additional gadgets, including a stand and a pop-up filter. If you use a shock stand with your Yeti microphone, it will keep vibrations from ruining your sound.
Another thing that might ruin your sound is plosives which you produce when pronouncing certain consonants, e.g., P, T, and B. To correct this issue, you’ll need the pop-up filter to cover your mic. Lastly, cords might interfere with your audio transmission, so keeping them away from your setup is generally a good idea.
Figuring out how to use the Yeti microphone should allow you to get the audio quality you’ve always wanted. Notably, your audience will thank you for that as they will enjoy your new and improved content more. Also, you can always ask for clarification if there’s any section of the above write-up that you didn’t understand.