Last updated: April 14, 2026
Professional violinists and serious violin enthusiasts change their strings every often. Non-professional violinists can replace their strings every 3 to 6 months. It is important for every musician, whether seasoned or upcoming to learn how to change violin strings because it is a routine maintenance that should be carried out often.
Anyone can master how to change violin strings with a little practice. Novices can rely on the help of a luthier or a professional as learning the correct technique is key. You won’t spend more than 20 dollars in any music store. All you have to do is call ahead and book an appointment clearly indicating that you would love to observe the process. You can do this 1 or 2 times before you can change the strings yourself under supervision. Read on for more details about the process of changing violin strings.
When it comes to changing violin strings, there are too many variables to assign a particular timeframe. At the very least, you should replace your strings every 9 to 12 months. There’s really no harm in replacing your strings too soon apart from the cost.
Waiting too long to replace the strings, on the other hand, has dire consequences. Old worn out strings don’t produce the best sound quality. You will also have to press harder while playing the strings. This may lead to overuse injuries on your wrist or shoulder.
Moreover, when the strings become too thin, they can break and fly off in the midst of you playing the instrument. This may be uncomfortable and hurtful. To avoid all these inconveniences you better learn how to tell when it’s time to replace the strings.
Every violinist should know when to change the strings on their instrument. Changing them too often has the consequence of spending quite a bit of money and changing them too late has serious drawbacks, from sounding bad to long-term injuries.
For you to know when to change your strings, you must learn the causes of string wear and tear. Here are some of the most common causes for violin string wear and tear:
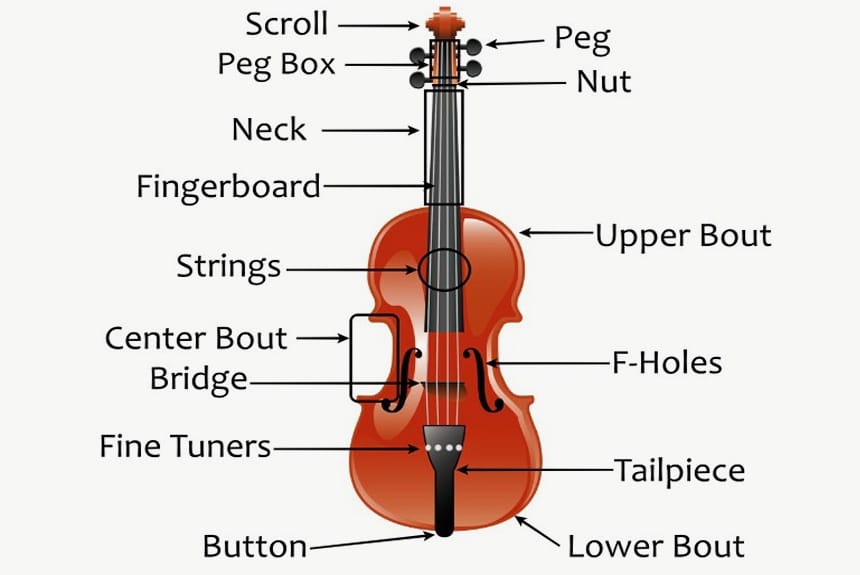
Violin set-up
In most cases, the nut on the violin and the way the bridge has been cut negatively impacts the strings. If the grooves on the nut or bridge have not been cut properly, agitation increases stress on them decreasing their lifespan. Eventually, the strings wear out sooner than normal.
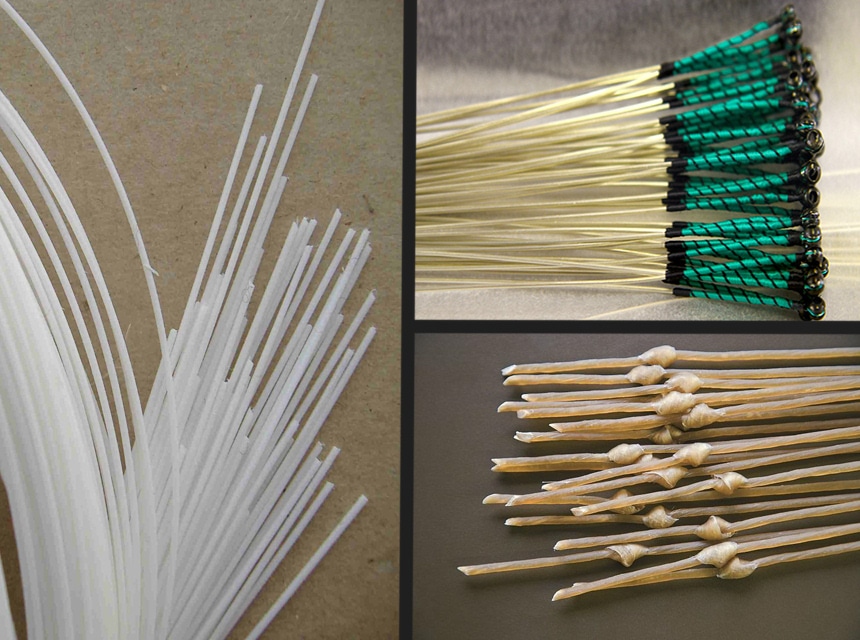
The material used to make the strings determines their longevity. Some materials wear out faster than others. Strings made from gut are highly acclaimed but their material doesn’t last as long as steel fabricated strings. As much as steel lasts longer, it is not a favorite go-to for most musicians. Synthetic nylon strings are the clear winner when it comes to strength and warmth combination. They sound great and have a long lasting power.
Dirt, oil on your hands and rosin build up can cause your strings to wear out quickly. You can prevent this by wiping of your strings with a dry piece of cloth every time you are done playing.
String deterioration is relative to the type of strings and instrument you are using. How often you play also plays a huge role in the wear and tear of your violin strings. Here are a few tell-tale signs that will let you know it’s time to change your string set;
If you happen to recognize that you can’t achieve the resonance you have always had or you’re having a difficult time with vibrato, then it’s time you changed your strings. Also, if you must use more and more pressure with your bow to achieve a good sound quality, it’s a high time you got a new string set.
If you have to tune your strings all the time even during a practice session, there are high chances they are worn out. It shouldn’t take you lots of adjustments to achieve the right pitch unless you are still learning how to tune a violin.
When you are not feeling your sound and your strings aren’t damaged you can still replace them for a whole new vibe. A new set of springs can inspire new playing energy.
For you to make the most out of your violin, it is important that you select the right strings. Here are some string recommendations:
Gold and platinum plated carbon steel Es yield a warmer tone for the entire set but are more prone to whistling. When whistling or squeaking is an issue, Aluminum-wound Es save the day. Chrome-wound E strings are used to match the tone of chrome-wound fiddling A, G and D strings.
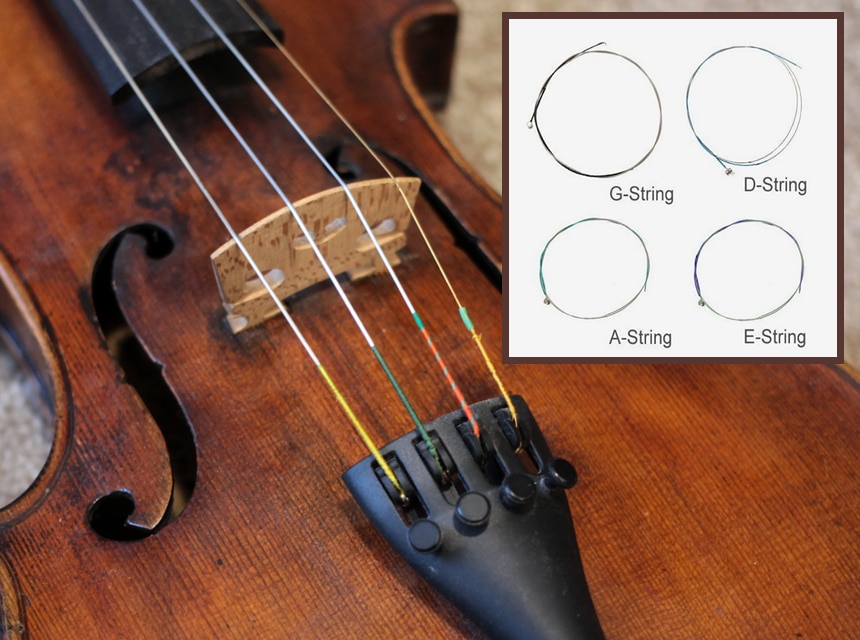
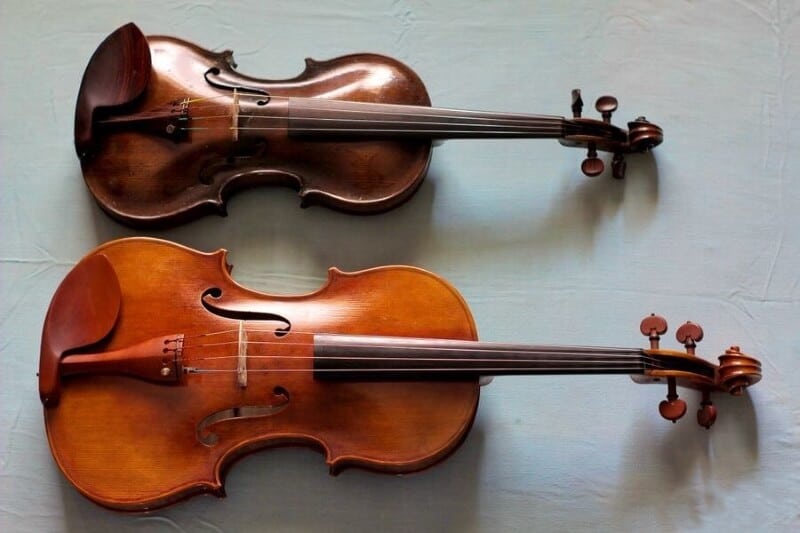
Violins come in various sizes, ranging from 4/4 which is the full size to 1/32. To prevent damage to the violin, strings are sized according to the instrument’s size. Although 1/10 size strings are not made by manufacturers. You can use the 1/8 size strings for your 1/10 violin.
This is the thickness of a violin’s string. Heavier strings put more stress on the violin and their response is much slower. If your violin is not up to the pressure, the tone may come off somewhat pinched or closed off and the violin may end up getting damaged. String gauges are not standardized and they can be thicker or thinner across different sets.
The medium or mittel gauge is the one recommended by most manufacturers.
For lower string tension, softer tone and faster response, go for a light gauge, also known as Weich or weak gauge.
When looking for the best sound you will come across terms like brilliant, edgy, dark, dull, bright, and warm. The terms are used to describe the frequency distribution produced. There is no precise definition as players have different perceptions of sounds. Some of the words are positive while some are negative and for you to find the right strings for your instrument, you must balance the tone colors based on your tastes, ears and style of music.
Other than tone color, there are other aspects that come into play when choosing strings for a violin. They include price, longevity, and ease of play. Also, if you seem to have trouble finding the right strings for the sound you are looking for, you should check the other parts of the violin. The bow, rosin, shoulder and chin rests also impact the resulting tone.
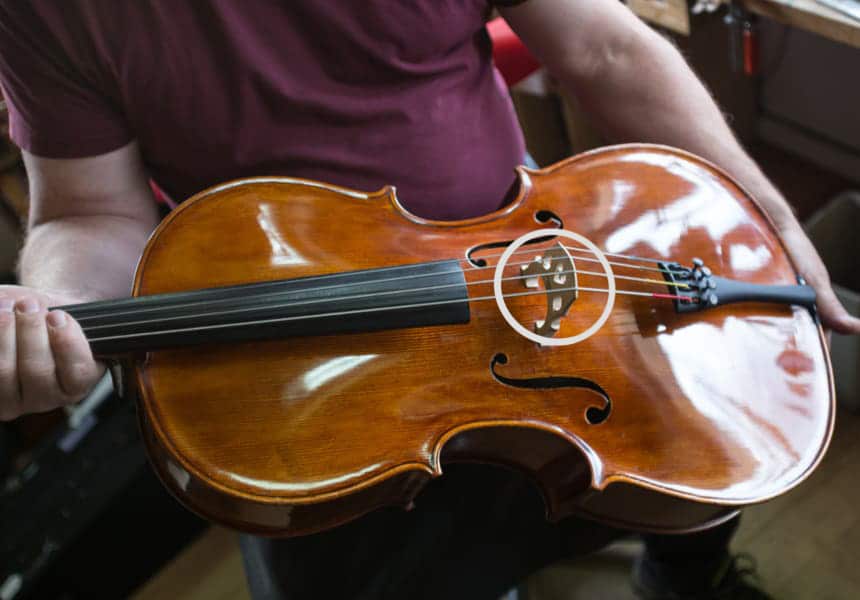
Changing a violin’s strings requires some skill but shouldn’t be daunting. Here is a step by step guide on how to remove the old string and replace it with a new one. You must follow the steps keenly and adhere to the tips to prevent the strings from snapping or slipping out of place.
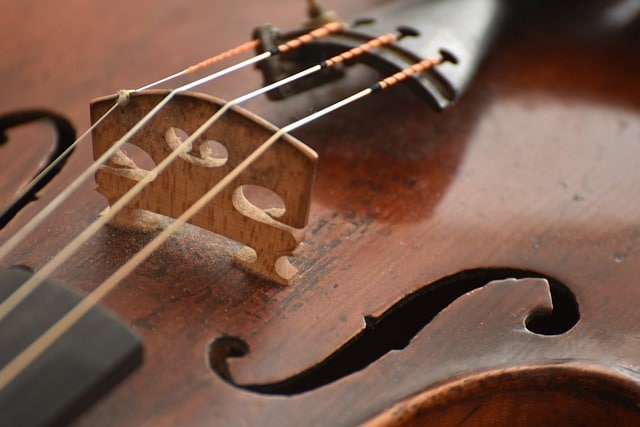
Before you touch anything, keep in mind that violin strings are best changed one at a time to avoid disturbing the setup on the bridge. It is the tension of the strings that hold the bridge and the soundpost inside the violin. Removing more than one string destabilizes the bridge.
Also, experiment with different types of strings to get the perfect one that works for you.
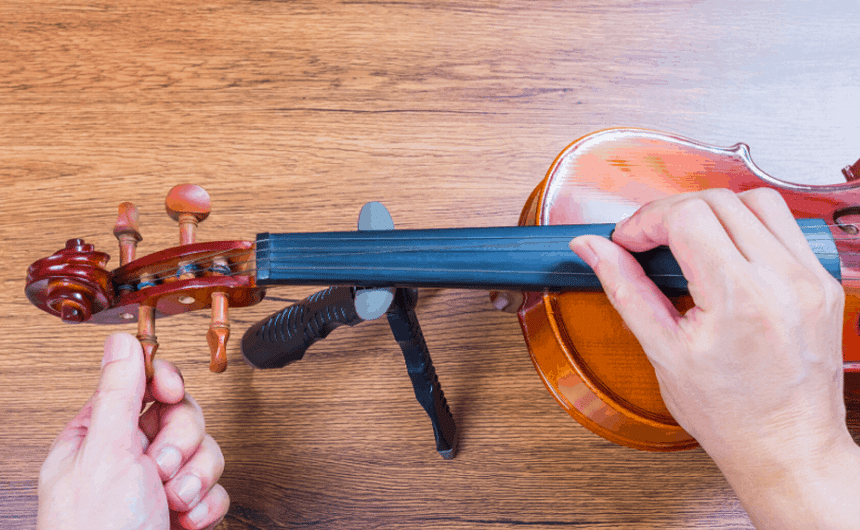
Place the violin on a steady position like your lap or any other place where it won’t slip when you are changing the strings. Unwind the peg gently to loosen the string before you remove it. Turn the peg until the top end of the string pops out of the hole in the peg then pull it away from the violin.
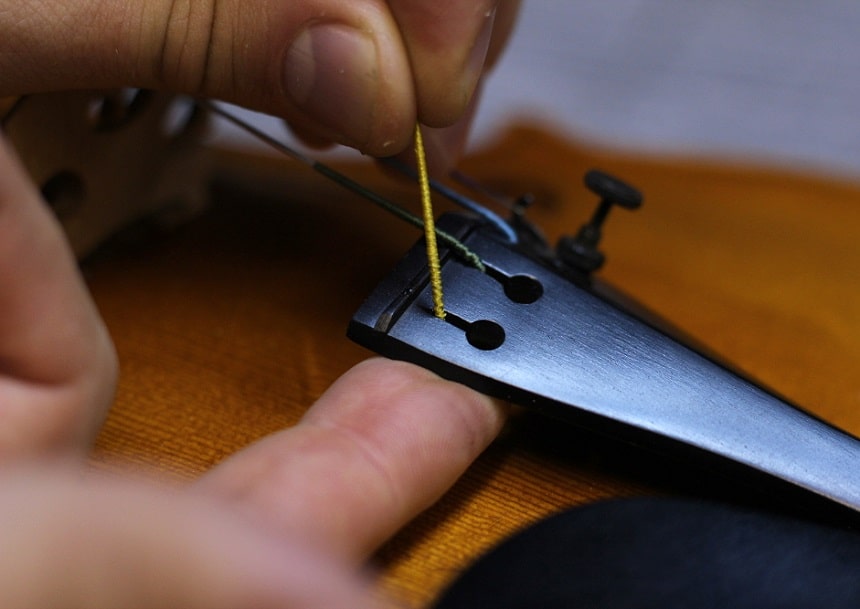
Some strings come with a ball end which is a small ball in the loop at the bottom end. If that’s the case with yours, wiggle it a bit to detach it from the violin’s tailpiece. If your string only has a loop end, simply lift it off the hook on the fine tuner.
Once you have removed, the string, check the condition of the peg to ensure it is clean and will be smooth and secure when you place the new string in. If the peg is not clean, it can stick and squeak and it won’t turn smoothly. If the peg’s surface is worn, you can lubricate it using a peg lubricating compound like HILL the Original Peg Compound. It will make the pegs turn smoothly.
Ensure the hole in the middle of the peg is visible and accessible so you can insert the end of the string through it. Also, it shouldn’t be on the wrong side of any of the other strings.
With the hole in the peg facing you, thread the end of the new string through it. The string should poke on the other side of the peg if you push it right. Only allow 1-inch or less to poke through the other end. Turn the peg a few time to secure the string in place. You can use the adjacent string to guide you as you wind the string to ensure you keep it in a tidy coil.
Push the peg towards the peg box to secure it. Ensure there is enough friction between the peg and the hole of the peg box. Turn the peg from you slowly then guide the string towards the inside of the peg box with your index finger. If your string has a ball end, insert it in the hole in the tailpiece then ensure it is secure. If it has a loop end, loop it into the hook just above the fine tuner.
Once you have safely attached the bottom end of the string, hold the string tightly so that both ends remain secure. By now, you other hand should be holding the peg. If you let go the string will uncoil and you will have to start afresh.
Still holding the string tightly, move your hand slowly back up towards the top of the violin until both your hands can reach the pegs. Start winding the peg away from you slowly until the string is no longer loose but not completely tightened.
You will know the string is tight enough by looking at it and feeling it. When you pluck it, it should be able to vibrate and produce a definite pitch.
When you turn the pegs and the string tightens, pressure is applied to the bridge towards the peg box. With time, the pressure will pull the bridge until it slants away from the tailpiece. If not monitored and corrected, the bridge can collapse. That said, always ensure you check the vertical position of the bridge every time you change a string.
Next, loosen up all the fine tuners in the tailpiece then use either an electronic tuner, pitch pipe or tuning fork to check for the desired pitch of the string. If you are overwhelmed with the options available, consider the popular QIYUN Tuning Fork. It is highly recommended by experts because it delivers longer sound, clear tone and accurate tuning. It is also built to last with high-quality polished and plated steel.
Learning the violin doesn’t stop and learning how to play or tune it. As a violinist, it is important that you learn how to change strings on a violin. Restringing your violin has more benefits than just improving its sound quality. We have provided detailed information on how to know when to change violin strings and how often to change them.
The step by step guide works for different types of violins, whether it’s one for kids, beginners or seasoned players. Once you are done changing the string, you have to tune it for you to get the best sounds from it. It will definitely take a while to settle before it gets used to the new level of tension. Therefore, you might have to tune it several times.